Do you know Github? If yes you can skip this article. If not are you even a developer?
Github has become a part of developers’ lives, Whether you are, an engineer, frontend, backend, security specialist, hacker, or anything related to IT, Github plays an important role.

Before jumping into the exploration of GitHub, I have one quick question. Do you know Open Source?
What is Open Source?
Have you ever used a Linux operating system? Ubuntu is one of the popular Linux distros and you may have heard that Linux is open-source. Unlike Windows, you don’t have to pay any money to get a Linux operating system. Linux is available for free.
Open-source software is computer software that is released under a license in which the copyright holder grants users the rights to use, study, change, and distribute the software and its source code to anyone and for any purpose. Open-source software may be developed in a collaborative public manner.
What is GitHub?
People use GitHub to build some of the most advanced technologies in the world. Whether you’re visualizing data or building a new game, there’s a whole community and set of tools on GitHub that can help you do it even better. GitHub Skills’ “Introduction to GitHub” course guides you through everything you need to start contributing in less than an hour.
Let’s enter into the world of Open Source…
GitHub is the Gateway to Open Source.
Course Content:
- Who is this for: New developers, new GitHub users, and students.
- What you’ll learn: We’ll introduce repositories, branches, commits, and pull requests.
- What you’ll build: We’ll make a short Markdown file you can use as your profile README.
- Prerequisites: None. This course is a great introduction to your first day on GitHub.
- How long: This course takes less than one hour to complete.
Let’s create a GitHub Account
1. Sign up on Github: Github Signup
2. Enter your email address

3. Now enter your password and don’t forget to choose a cool Username.

Voila! You now entered the world of Opensource
Let’s Learn Github by Completing these tasks
Initial Setup :
0. Click on this link -> Start Course
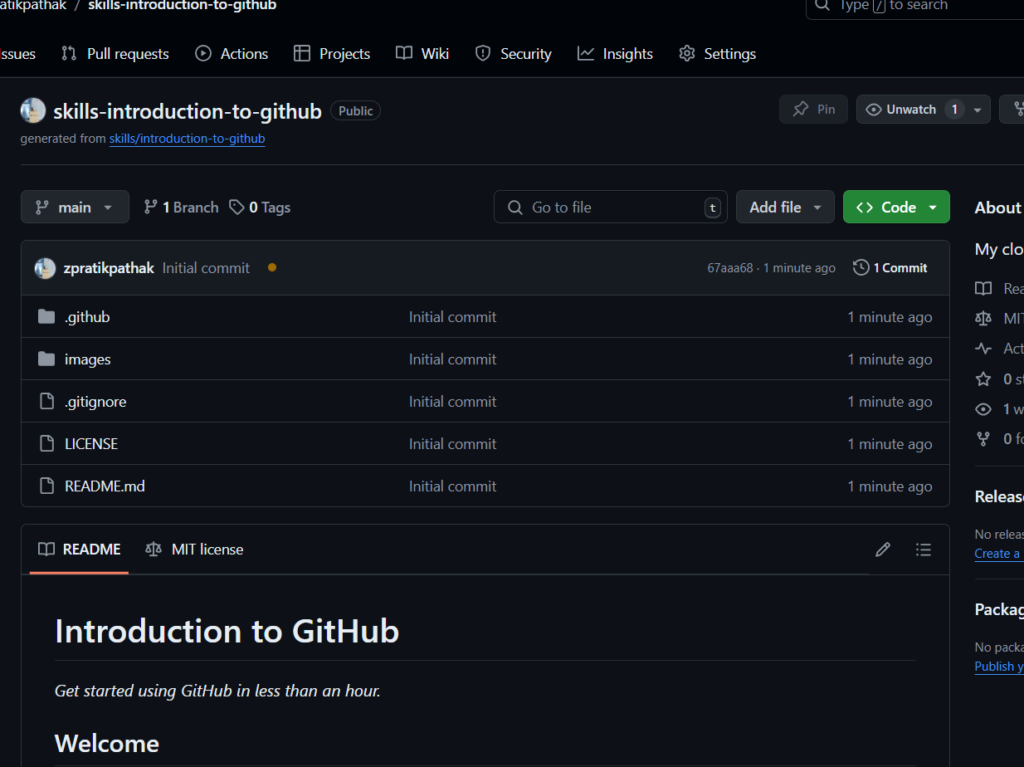
1. Keep all the values to default, at the bottom of the page you will find a “Create Repository”. Click on it

2. It will redirect it to this page. After couple of minutes, “Refresh” the page
Task 1: Creating a branch on GitHub Repository
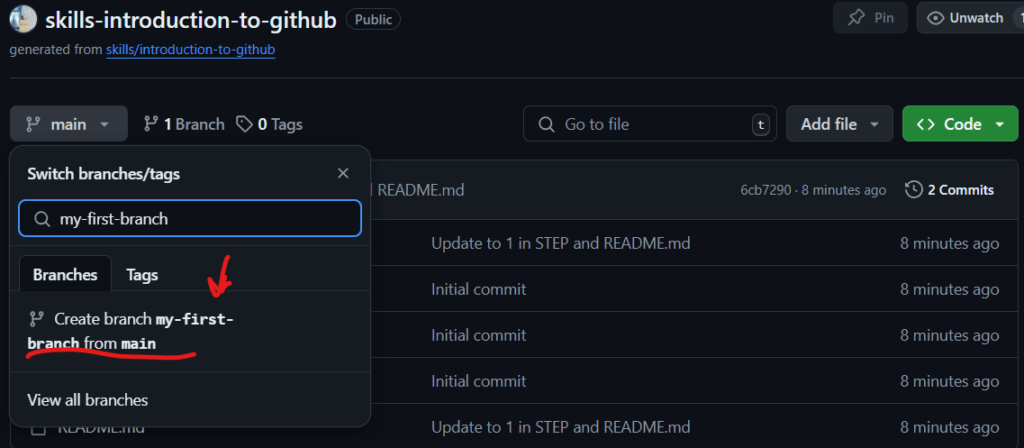
1. Click on the branch drop down menu.

2. In the field, name your branch my-first-branch. In this case, the name must be “my-first-branch” to trigger the course workflow.
4. Click Create branch: my-first-branch to create your branch.
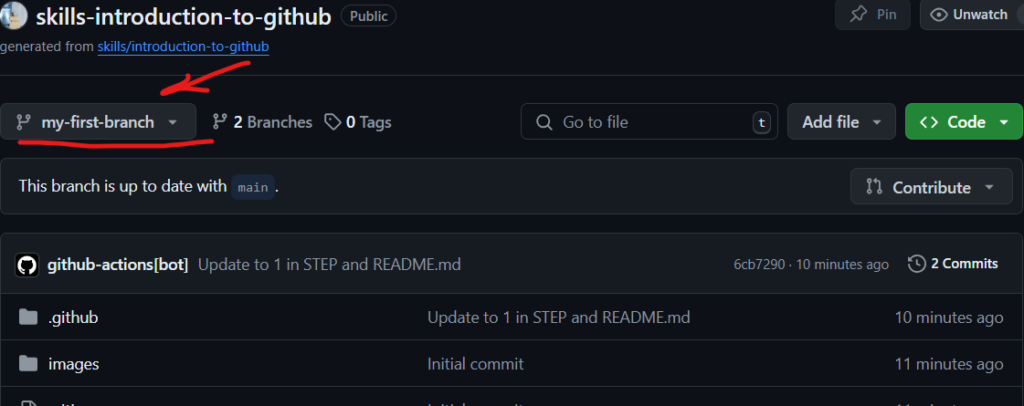
5. The page will auto-refresh and switch to a new branch if not you can switch it manually. Make sure you are on this branch for the next task.
6. Wait about 20 seconds, and refresh the page. Github Action will update the page for you.
Task 2: Adding Commits to the Branch
You created a branch! ????
Creating a branch allows you to edit your project without changing the main branch. Now that you have a branch, it’s time to create a file and make your first commit!
What is a commit?: A commit is a set of changes to the files and folders in your project. A commit exists in a branch. For more information, see “About commits“.
1. Click on “Add file” and click on “Create new file”

2. Name the file as “PROFILE.md”
3. Now write the below text in the file.
Welcome to my GitHub profile!
4. Click Commit Changes.
5. Enter the description of Commit and click on “Commit”

6. Wait about 20 seconds, and refresh the page. Github Action will update the page for you.
Task 3: Create a PR (Pull Request)
Nice work making that commit! ✨
Now that you have made a change to the project and created a commit, it’s time to share your proposed change through a pull request!
What is a pull request?: Collaboration happens on a pull request. The pull request shows the changes in your branch to other people and allows people to accept, reject, or suggest additional changes to your branch. In a side by side comparison, this pull request is going to keep the changes you just made on your branch and propose applying them to the main project branch. For more information about pull requests, see “About pull requests“.

You may have noticed after your commit that a message displayed indicating your recent push to your branch and providing a button that says Compare & pull request.
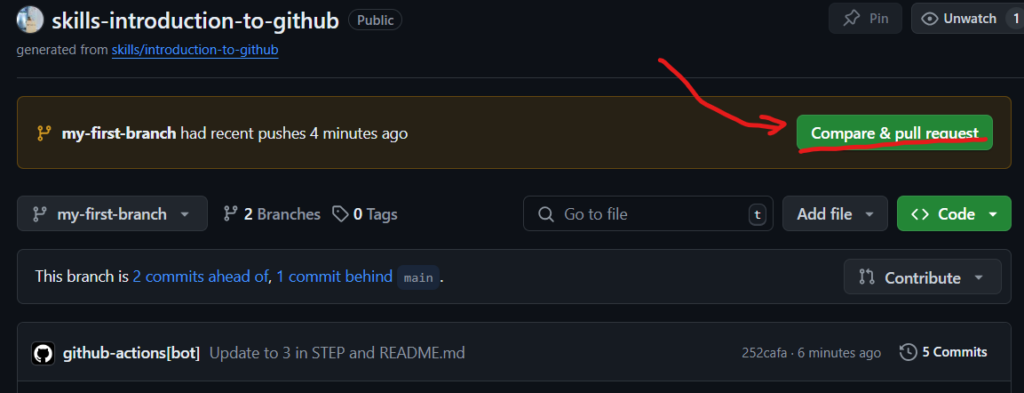
To create a pull request automatically, click Compare & pull request, and then skip to step 6 below. If you don’t click the button, the instructions below walk you through manually setting up the pull request.
1. Click on the Pull requests tab in the header menu of your repository.
2. Click New pull request.
3. In the base: dropdown, make sure main is selected.
4. Select the compare: dropdown, and click my-first-branch

5. Click Create pull request.
6. Enter a title for your pull request. By default, the title will automatically be the name of your branch. For this exercise, let’s edit the field to say Add my first file.
7. The next field helps you provide a description of the changes you made. Here, you can add a description of what you’ve accomplished so far. As a reminder, you have: created a new branch, created a file, and made a commit.
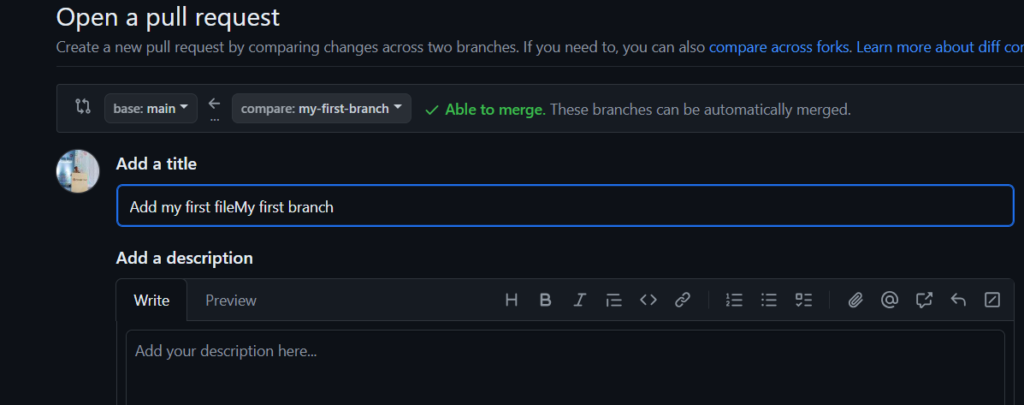
8. Click Create pull request. You will automatically be navigated to your new pull request.
9. Wait about 20 seconds, and refresh the page. Github Action will update the page for you
Task 4: Approve and Merge a PR
Nicely done! 😀
You successfully created a pull request. You can now merge your pull request.
What is a merge?: A merge adds the changes in your pull request and branch into the main branch. For more information about merges, see “Merging a pull request.”
1. Click Merge pull request.
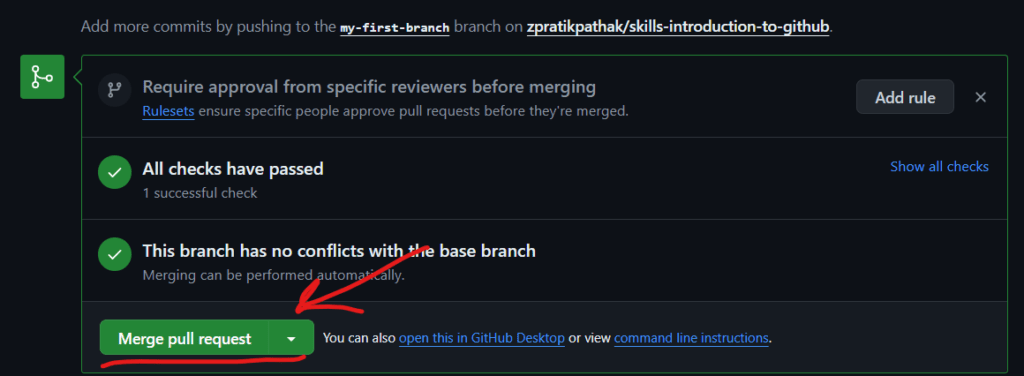
2. Click Confirm merge.

3. Once your branch has been merged, you don’t need it anymore. To delete this branch, click Delete branch.

4. Wait about 20 seconds, and refresh the page. Github Action will update the page for you.
Task 5: Final Task
Appreciate yourself you completed this course ;D
Congratulations, you’ve completed this course and joined the world of developers!
Here’s a recap of your accomplishments:
- You learned about GitHub, repositories, branches, commits, and pull requests.
- You created a branch, a commit, and a pull request.
- You merged a pull request.
- You made your first contribution! ????